Banking
Overview
The Banking screen manages your accounting firm’s own bank accounts and transactions — distinct from the client bookkeeping found in the Books module. This is where you track the firm’s operating account, trust account, and credit card accounts, import bank statements, and categorise transactions against internal chart-of-accounts categories. Bank rules can automate repetitive categorisation so that recurring payees (rent, payroll, software subscriptions) are categorised instantly on import.
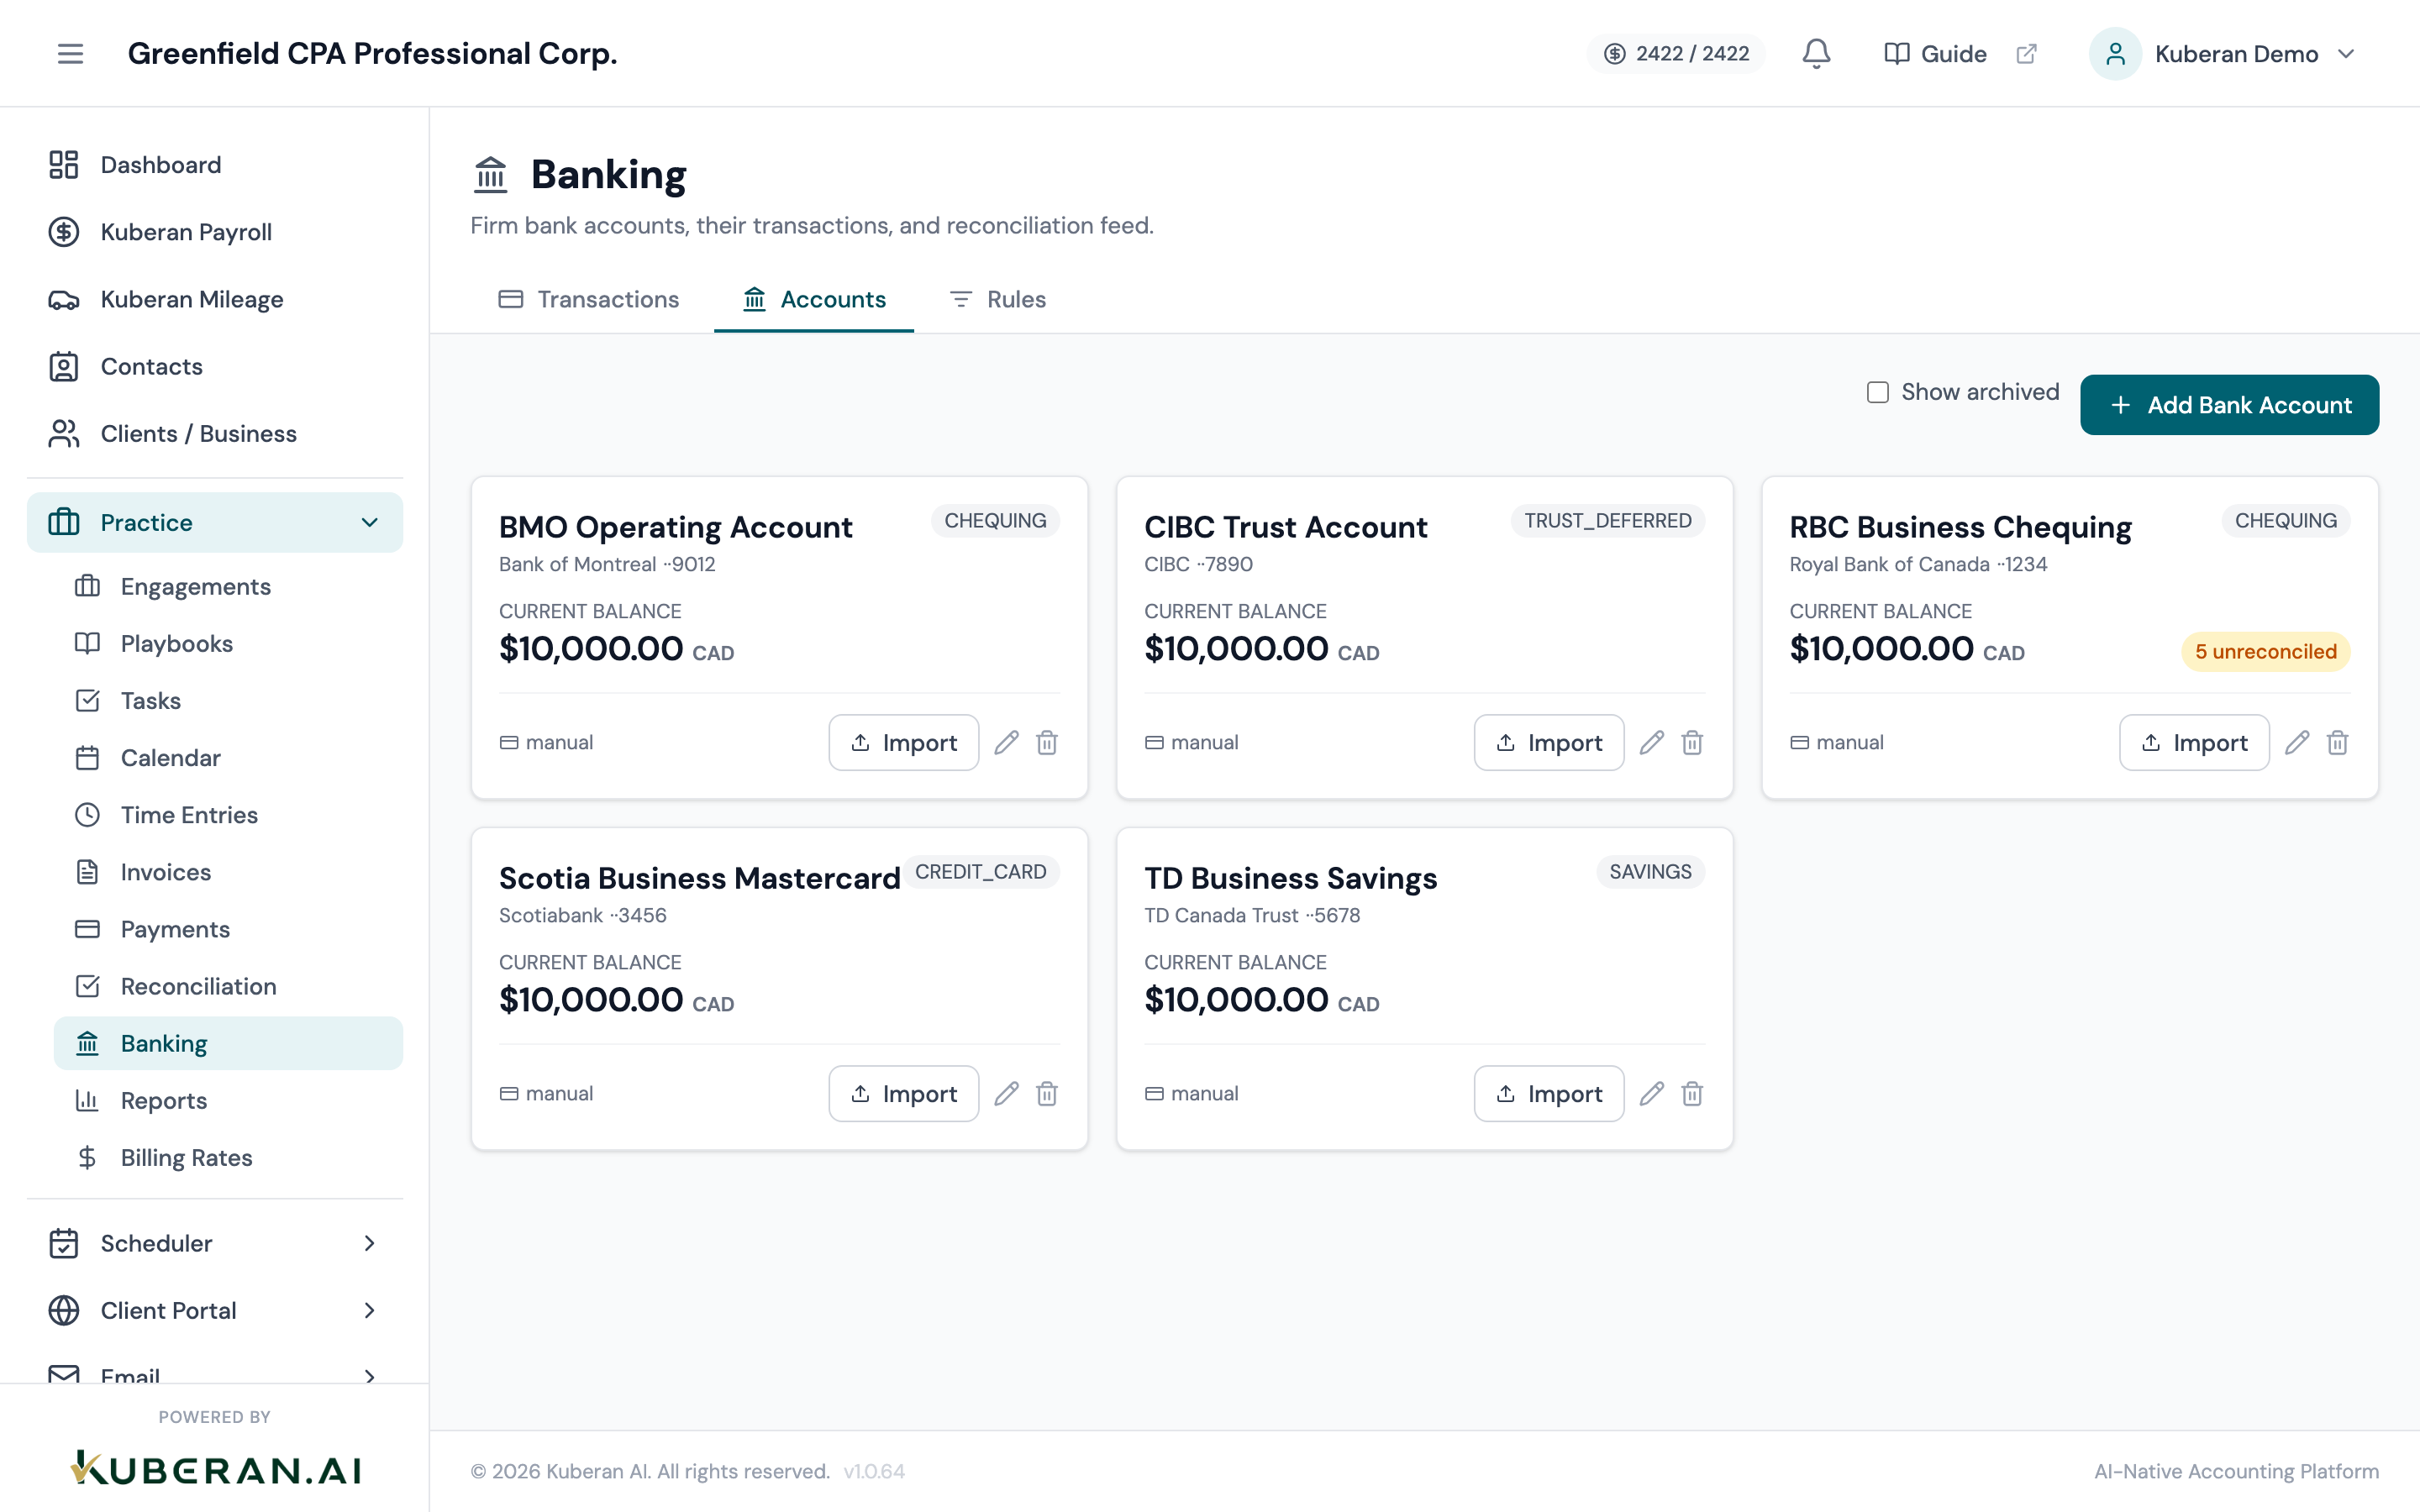
- (1) Accounts tab — lists all connected or manually added firm bank accounts
- (2) Transactions tab — shows imported transactions for the selected account and date range
- (3) Add Account button — connect via Plaid or add manually
- (4) Import button — import transactions from a CSV, OFX, or QBO file
- (5) Bank Rules button — manage auto-categorisation rules
Screen Layout
The Banking screen has two primary tabs:
Accounts tab: Lists every firm bank account. Each account shows the institution name, account name, account type (Chequing, Savings, Credit Card, Trust), last four digits of the account number, the last-import date, and the current imported balance.
Transactions tab: Shows the transaction ledger for the currently selected account. A date range picker, search field, category filter, and reconciliation status filter appear in the toolbar. The transaction table shows individual rows with categorisation controls.
Accounts Tab
UI Elements
Opens a modal to add a new bank account. Choose between Plaid (automated bank connection) or Manual (enter account details yourself).
Each account is displayed as a card showing the account name, institution, type, masked account number, last-import timestamp, and current balance from the most recent import. Click to select the account and switch to the Transactions tab showing that account’s transactions.
Opens the account settings drawer. You can rename the account, change its type, update the opening balance, or disconnect from Plaid.
Permanently removes the account and all its imported transactions. A warning is shown if any transactions are unreconciled.
Green “Connected” badge if the account is live via Plaid; grey “Manual” if transactions are imported by file. A “Refresh Required” amber badge appears when Plaid authentication needs renewal.
Transactions Tab
UI Elements
Dropdown at the top of the Transactions tab to switch between firm accounts without returning to the Accounts tab.
Filter transactions by date. Defaults to the current month. Quick presets: This Month, Last Month, This Quarter, Custom.
Search transactions by payee name, description, or reference number.
Filter to show only transactions assigned to a specific category, or show uncategorised transactions only.
Options: All, Unreconciled, Reconciled. Use “Unreconciled” to focus on transactions that have not yet been matched in a reconciliation.
Opens the import dialogue to upload a CSV, OFX, or QBO file from your bank. Kuberan AI detects the format automatically and maps standard columns.
Opens the Bank Rules manager where you can create, edit, and delete auto-categorisation rules.
Downloads the filtered transaction list as CSV.
Transaction Row Columns
Transaction date from the bank statement. Sortable.
The payee name or description string from the bank statement. May be auto-cleaned by Kuberan AI’s payee normalisation.
Transaction amount. Credits shown in teal; debits shown in dark text with a minus sign.
Dropdown field on each row to assign or change the account category. Uncategorised transactions show a grey “Categorise” placeholder. Auto-categorised transactions show the matched category with a small rule icon.
Green tick if the transaction has been matched in a completed reconciliation. Blank if unreconciled.
Options: Edit (change payee name, amount, or date), Create Rule (creates a bank rule based on this transaction’s payee), Exclude (marks the transaction as non-book; hidden from reports), Delete.
Bank Rules Manager
Internal label for the rule (e.g., “Stripe — Software Revenue”).
The text pattern to match against the payee/description field. Options: Contains, Starts with, Exactly matches. Case-insensitive.
The category to apply when the condition is met.
Numeric priority (1 = highest). If two rules match the same transaction, the one with the higher priority wins.
Actions
Add a Bank Account
- On the Accounts tab, click Add Account.
- Choose Connect via Plaid for automated live bank feeds, or Add Manually for file-import only.
- For Plaid: follow the Plaid authentication flow (select institution, enter credentials). Once authorised, select the specific accounts to connect. Kuberan AI begins fetching transactions from the past 90 days.
- For Manual: enter the Account Name, Institution Name, Account Type (Chequing, Savings, Credit Card, or Trust), and the opening balance with its effective date.
- Click Save. The account card appears in the Accounts list.
Import Transactions
- Select the target account using the Account Selector on the Transactions tab.
- Click Import. The import dialogue opens.
- Drag and drop your file (CSV, OFX, or QBO) into the upload area, or click Browse to select it.
- Kuberan AI detects the format and shows a preview of the mapped columns (Date, Description, Debit, Credit). Verify the mapping is correct; adjust column assignments if needed for CSV files.
- Set the Date Range if you want to limit which rows are imported (useful for avoiding duplicate imports).
- Click Import Transactions. Transactions are added to the ledger and bank rules are applied automatically to any matching rows.
- Review the import summary showing the count of new transactions imported, duplicates skipped, and transactions auto-categorised by rules.
Categorise a Transaction
- On the Transactions tab, locate an uncategorised transaction (shown with a grey “Categorise” placeholder in the Category column).
- Click the Category dropdown on the transaction row.
- Select the appropriate account category from the list. Start typing to filter the list by category name.
- The category is saved immediately. The transaction row updates to show the selected category.
Create a Bank Rule
- Right-click or click ⋯ → Create Rule on a transaction whose payee pattern you want to automate.
- The New Bank Rule drawer opens with the match pattern pre-filled from the transaction’s payee name.
- Adjust the Match Condition type (Contains / Starts with / Exactly matches) as needed.
- Select the Assign Category from the dropdown.
- Enter a Rule Name for easy identification.
- Click Save Rule. The rule is applied immediately to all existing uncategorised transactions that match the condition, and will apply automatically to all future imports.
Export Transactions
- Apply date range, category, and reconciliation status filters to define the data set.
- Click Export (download icon).
- A CSV file containing all filtered transaction rows downloads to your device.
Related
- Reconciliation — Match imported transactions to bank statements for period-end reconciliation
- Reports — Billing and revenue reports draw on categorised banking data
- Payments — Client invoice payments may appear as credits in your banking transactions